Choosing the best tpms service kit begins with safety, not the lowest price. A reliable kit should include sensor valves, seals, valve cores, caps, grommets, and torque guidance. These small parts sit inside a wheel exposed to heat, moisture, road salt, and repeated pressure changes. One missing seal can create a slow leak that is difficult to detect.
The National Highway Traffic Safety Administration’s Tire Pressure Monitoring System Final Rule estimated that TPMS technology could prevent approximately 6600 crashes and 238 fatalities annually in the United States. That figure explains why correct service matters beyond dashboard warnings. NHTSA also stresses that drivers must still check tire pressure manually. John Nielsen, former AAA Managing Director of Automotive Engineering and Repair, said, “TPMS is not a substitute for manually checking tire pressure.” The warning remains practical.
Fitment is the difficult part. A universal-looking valve may not match the wheel, sensor body, or vehicle relearn procedure. Check the vehicle identification number, sensor frequency, rubber compound, torque specification, and programming compatibility before installation. Confirm the kit supports the sensor brand being serviced.
Quality control matters. Tire Industry Association training materials emphasize proper demounting, replacement of serviceable components, and correct sensor installation. Still, product labels can be confusing, and compatibility databases are not always perfect. That is worth admitting.
A strong tpms service kit should reduce guesswork, prevent repeat labor, and leave a clear service record. The best choice is not necessarily the largest package. It is the one that matches the vehicle, wheel, sensor, and technician’s actual workflow.
A TPMS service kit maintains the seal between a tire valve and the wheel. Its purpose is simple but critical. It helps prevent slow air loss and protects the pressure sensor during routine tire service. A damaged seal may cause a warning light, even when the sensor works correctly.
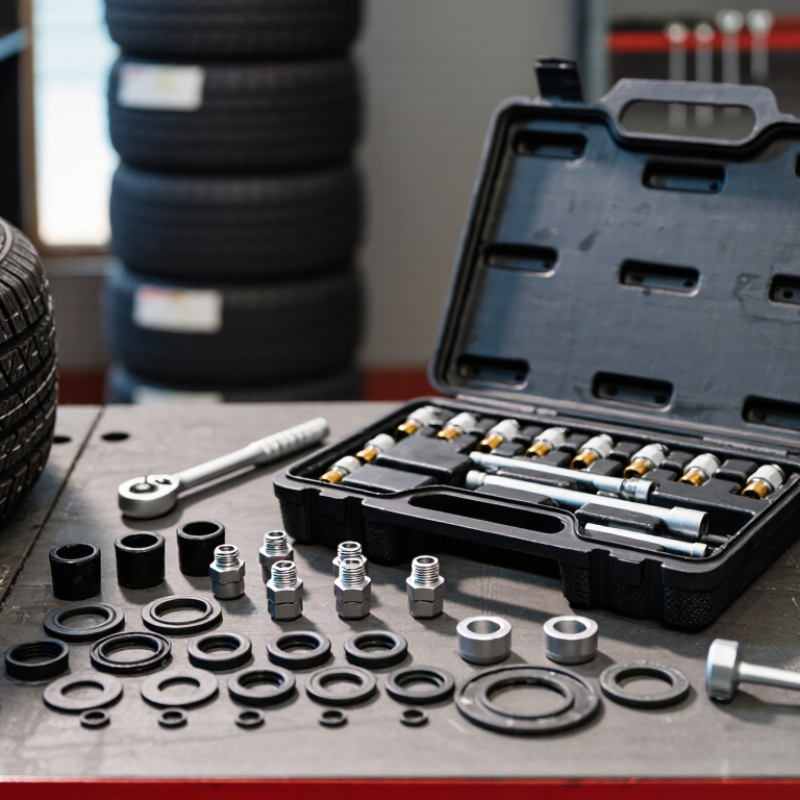
Typical components include a valve core, valve cap, rubber grommet, metal washer, retaining nut, and sensor screw. Some kits also contain a valve insert tool or a small torque guide. The grommet seals the valve hole. The washer spreads pressure against the wheel. The screw secures the sensor body. Match each component with the sensor design and wheel material. Never assume every kit fits every valve. That shortcut can become expensive.
Tips: Check the service instructions before installation. Replace sealing parts after sensor removal. Inspect threads for dirt or cross-threading. Tighten the retaining nut to the stated torque, not by feel. Hand pressure is not a measurement. Also, check the valve cap and core for damage. A kit can look complete while containing an incorrect core. I have seen this small mistake create repeated pressure loss. Recheck the tire after inflation, because installation work is not perfect every time.
How to Choose the Best TPMS Service Kit?
Identifying Your Vehicle’s TPMS Sensor and Valve Requirements
Choosing a TPMS service kit starts with the actual sensor, not the package label. Check the vehicle year, trim, wheel type, and sensor frequency in a trusted service database. Direct systems use pressure sensors inside the wheel. Indirect systems estimate pressure through wheel-speed data and need no valve-mounted sensor.
Inspect the removed valve assembly carefully. A metal clamp-in valve usually needs a specific grommet, washer, nut, and valve core. A snap-in rubber valve needs a matching stem and seal. The sensor body may look correct but still use a different mounting angle. Measure the stem and compare the sensor’s shape before ordering. Small differences matter. I have replaced seals that looked usable, then found slow leaks after inflation. That mistake taught me to treat rubber parts as service items, not optional extras.
Replace the seal, valve core, cap, and retaining hardware when the service procedure requires it. Check corrosion around the valve hole, too. My first assumption was wrong. Similar sensors are not always interchangeable. Confirm compatibility through the vehicle identification number, sensor specifications, and relearn procedure. After installation, use a suitable scan tool and verify each wheel’s reading. A short road test can expose a missing signal, but it cannot excuse poor inspection. Keep the old parts available for comparison.
| Vehicle / TPMS Condition | Sensor and Valve Configuration | Recommended Service Kit Contents | Important Selection Checks |
|---|---|---|---|
| Direct TPMS with an aluminum clamp-in valve Common on passenger cars and light commercial vehicles |
The pressure sensor is attached to the inside of the wheel through a metal valve stem. A sealing grommet, valve core, nut, washer, and cap are typically used. | Correct sealing grommet, valve core, retaining nut, washer, valve cap, and any required sensor-to-valve screw or clip. | Match the valve angle, stem length, hole diameter, thread type, and sensor attachment design. Replace sealing parts whenever the sensor is removed. |
| Direct TPMS with a rubber snap-in valve Used on selected wheel and sensor designs |
The sensor is mounted inside the wheel and uses a flexible rubber valve stem that snaps through the rim hole. | Matching rubber valve stem, sealing grommet if applicable, valve core, valve cap, and the correct sensor fastener. | Confirm the snap-in stem is approved for the sensor body and wheel hole. Do not substitute a standard tire valve if the sensor requires a dedicated stem. |
| Direct TPMS with a high-pressure or heavy-duty valve Light trucks, vans, trailers, or vehicles with higher load requirements |
A reinforced metal valve or a vehicle-specific valve assembly may be used with a sensor designed for higher pressure or heavier service. | Heavy-duty sealing grommet, compatible valve core, retaining hardware, protective cap, and sensor mounting hardware rated for the application. | Check the maximum cold inflation pressure, wheel construction, valve material, and load application before selecting the kit. |
| Direct TPMS sensor replacement Sensor is damaged, has a depleted battery, or is being replaced |
The existing valve hardware may be reusable only if it is undamaged and the service procedure permits reuse. Sealing components are normally treated as replacement items. | New grommet, valve core, nut or fastener, washer where specified, and valve cap. Include a new valve stem when the old stem is corroded, distorted, or damaged. | Verify sensor frequency, communication protocol, vehicle compatibility, and whether sensor relearning or programming is required after installation. |
| Aluminum valve exposed to moisture or road salt | Metal valve assemblies can experience corrosion around the valve hole, sealing surfaces, threads, or retaining nut. | New corrosion-free sealing grommet, compatible valve core, nut, washer, and cap. Use approved materials for contact with the valve assembly. | Inspect the wheel and valve thoroughly. Replace damaged or heavily corroded parts rather than relying on a new seal alone. |
| Vehicle with an indirect TPMS system Pressure is inferred through wheel-speed or other vehicle data |
There may be no pressure sensor or TPMS-specific valve inside the wheel. The system generally uses existing wheel-speed sensors and control software. | Usually a standard tire valve service kit is sufficient, unless the vehicle uses a separate valve-mounted sensor design. | Confirm the system type before ordering a TPMS kit. After correcting tire pressures, a system reset or calibration may be required. |
| Wheel with a non-standard rim hole or special valve angle Custom, specialty, or application-specific wheels |
The valve may require a particular stem diameter, bend angle, length, or sealing profile to sit correctly in the wheel. | Application-specific valve stem, matching grommet, core, retaining hardware, and cap. | Measure the rim hole and compare the valve geometry with the wheel and sensor. Incorrect angles can cause clearance problems or sealing failure. |
| Any TPMS valve service General installation and maintenance requirements |
The valve assembly must remain airtight, correctly aligned, and securely fastened without damaging the sensor or wheel. | Valve core tool, torque-controlled installation tool, replacement sealing parts, valve caps, and a leak-check solution or equivalent inspection method. | Use the vehicle or sensor manufacturer’s specified tightening torque. Check for leaks after assembly and complete the required TPMS relearn procedure. |
Selection rule: Identify the TPMS system type, sensor mounting style, valve material, wheel-hole dimensions, pressure rating, and relearn requirements before choosing a service kit. Exact component compatibility and tightening torque must be confirmed from the vehicle or sensor service specifications.
How to Choose the Best TPMS Service Kit?
Compatibility should guide every TPMS service kit purchase. Check the vehicle application, sensor design, valve angle, thread size, and sealing profile. A kit may look correct but still leak after installation. Confirm the required frequency and service procedure through reliable vehicle data or manufacturer documentation. Do not guess. Small details matter.
Quality depends on more than appearance. Inspect the valve stem for clean machining, even plating, and smooth threads. Nickel-plated brass cores can resist corrosion, while suitable aluminum stems need proper surface protection. Rubber seals should tolerate heat, ozone, and repeated pressure changes. Look for EPDM or another specified elastomer, not an unidentified compound. Material certificates and batch traceability add confidence, although paperwork alone cannot prove performance. I have seen attractive kits fail because a seal was slightly oversized. That is an easy mistake to miss.
Tips: Compare dimensions before installation. Replace the sealing washer, core, and cap when required. Use the specified torque, then check for leaks with soapy water. Keep kits sealed and dry during storage. Record the vehicle, part details, and installation result. This simple record helps identify recurring fit or material problems. A careful technician should also question unclear compatibility charts. Better information is sometimes needed before the kit is opened.
A reliable TPMS service kit should match your actual installation work. In my workshop, I check the tool list before opening the package. A torque driver helps secure the valve nut without damaging the sensor. A valve core tool should fit cleanly and turn smoothly. Some kits also include a valve puller, socket, and small cleaning brush. These details matter when working beside a tire bead or a narrow valve hole.
Replacement parts deserve closer attention. Look for valve cores, rubber grommets, metal washers, nuts, valve caps, and sealing rings. Each part should suit the sensor valve design and the wheel material. A damaged grommet may cause a slow leak after installation. I once reused a seemingly good seal and had to remove the wheel again. That mistake cost time and made me inspect every seal more carefully. Always compare the parts with the vehicle service information.
Package contents can be confusing. Count every item against the supplied list before beginning work. Check whether the kit contains enough parts for one sensor or a complete set. Inspect threads, rubber surfaces, and protective caps for dents or contamination. Instructions should explain tightening procedures and inspection points. If a torque value is missing, pause and verify it through a trusted technical source. Guessing feels quick. It is not reliable. Some kits include extras, but extras do not replace correct compatibility.
Choosing a Reliable TPMS Service Kit for Maintenance and Repairs
A dependable TPMS service kit should match the sensor type, valve design, and vehicle application. Check the service data before opening the package. A kit may include valve cores, seals, grommets, caps, nuts, and replacement washers. Each part must fit correctly. Small differences can cause air leaks or sensor damage.
In workshop maintenance, I inspect every seal for cuts, flattening, or hardening. I also check the valve stem threads by hand before using a torque tool. Never force a nut. That mistake can distort the stem. Use clean tools and keep replacement parts sealed until needed. Moisture and dirt can affect sealing surfaces. The correct torque specification should come from reliable technical documentation, not guesswork.
Material quality matters during repeated repairs. Nickel-plated valve cores can resist corrosion, while durable rubber compounds handle temperature changes better. Still, no kit suits every vehicle. I once selected a visually similar grommet that fitted loosely after inflation. It looked acceptable, but it failed a pressure check. That experience changed my inspection routine. I now compare dimensions, inspect the seating area, and test for leaks with approved methods. Keep service records, including the part used and the measured torque. That detail helps technicians identify patterns when a warning returns. Reliability often depends on careful checking, not a crowded package.